You have a ball of dough on the counter, soft and slightly tacky. You have a mental image of golden spirals dripping with thick cream cheese frosting. You also have a glass baking dish sitting right there in the cabinet. That dish is the reason your next batch might fail. The most common cinnamon roll baking mistake has nothing to do with the dough itself; it is the pan you pour into.
Why Your Pan Choice Actually Matters More Than the Recipe
Here is the thing nobody told me when I started baking. Different materials absorb and move heat in completely different ways. Your oven is just a hot box, it does not care if you are baking a delicate pastry or a frozen pizza. The pan is what transfers that heat to your food. If the transfer is uneven, your results are uneven. Period.
I learned this the hard way with a batch that looked beautiful on top. The centers were perfectly soft, the tops were brown, and I was already planning my victory photo. Then I flipped one out and saw the bottom. Black. Not burnished, not caramelized. Charred.
Look, I am not a scientist. But I know that a glass dish is a sneaky beast. It heats up slowly, but once it gets hot, it holds onto that heat like a grudge. A metal pan heats up fast and lets go fast. That difference changes your entire bake.
What Happens in a Glass Pan (and Why It Ruins the Bottom)
When you bake cinnamon rolls in glass, the glass absorbs heat slowly. The sides of your rolls firm up while the middle is still warm dough. The bottom of the dish gets hotter than the air around it. So you crank the bake time to get the middle done and the bottoms take a beating.
Glass is essentially a heat trap. The bottom of your rolls will darken and crisp far earlier than the dough above can set. You pull the pan out, the tops look golden, maybe a little pale. You flip one over and get a sad brown crust that crunches when you touch it. That crunch is not a texture anyone wants from a soft, fluffy cinnamon roll.
The other annoying thing about glass is that it makes the edges bake faster than the center. You end up with a pan where the corner rolls are tough and the middle ones are slightly doughy. It is a mess of competing textures. Honestly, it is the most frustrating way to ruin a batch.
The Metal Pan Difference and a Golden Spiral That Works
Metal, specifically a light to medium gauge aluminum or steel pan, conducts heat evenly and quickly. The bottom of the roll browns at the same rate as the sides and the top bake. The middle sets before the bottom scorches. You get a uniform rise and that deep golden color across every single curve.
I have a beat up, scratched metal baking pan that has probably seen two hundred batches. The scratches came from a decade of aggressive spatulas and careless stacking. But it still produces a perfect pan of rolls every time. That dark, tired looking sheet pan is my most reliable tool.
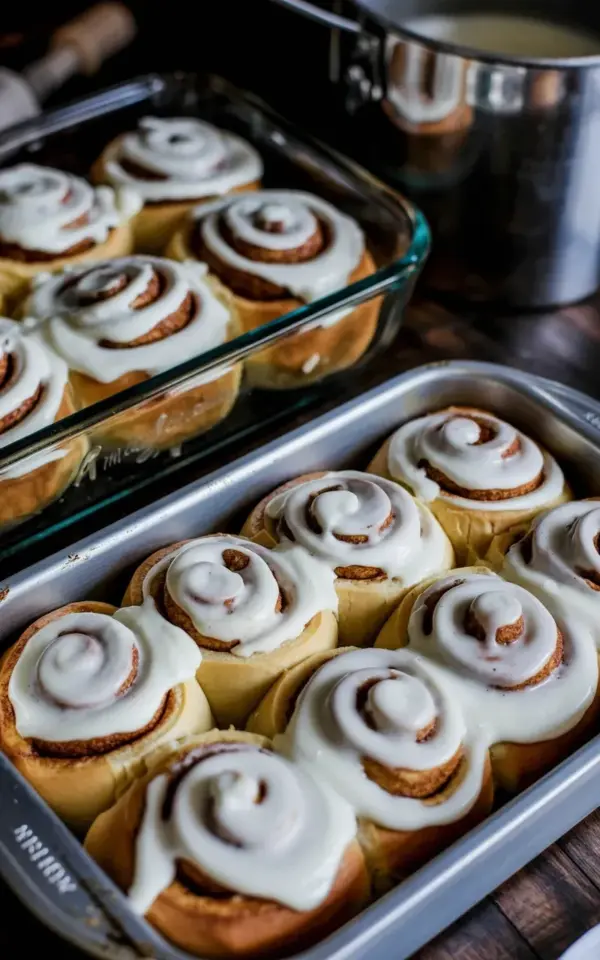
In the photo, the rolls in the metal pan have those distinct golden spirals. You can see the cinnamon and sugar swirl, clearly defined and set. The ones in the glass dish, the bottoms were a hot mess. I took that picture to remind myself why I stopped reaching for glass entirely.
How to Choose the Right Cake Pan for Homemade Cinnamon Rolls
Not all metal pans are created equal. You want something that does not have a nonstick coating that flakes, but you also do not want super heavy cast iron. Here is what I look for:
- A light or medium weight aluminum pan. It heats up quick and does not hold heat too long. But avoid anything too thin, a flimsy disposable pan will warp and cause hot spots.
- A pan with low or medium sides. High sides shield the top of the rolls and can create a steaming effect instead of a baking effect. You want airflow around the pastry. So a standard 9×13 cake pan or a round springform pan both work well.
- A light colored interior. Dark metal absorbs more heat and can still brown the bottoms too fast. If you only have dark metal, drop your oven temperature by 25 degrees to compensate.
- If you do not have a rectangular pan, a cast iron skillet is the only exception. It looks rustic and it handles heat nicely. But note that cast iron also holds heat, so watch the bottoms. Not gonna lie, I have burned more batches in cast iron than in glass, but the ones that work are spectacular.
You do not need specialty equipment. You need a standard metal baking pan that cost twenty dollars. That is it.
The Frosting Timing Thing Nobody Mentions
While the pan is a huge part of it, there is another small mistake people make right after the bake. They let the rolls cool completely and then they add the cream cheese frosting. That is fine if you like a thicker spread. But if you want that glossy sheen that drips down the sides like in the photo, you need to pour it on warm rolls.
Warm rolls let the frosting melt just a little at the base. It seeps into the top cut of the spiral and coats every nook. The cream cheese flavor stays strong, but the texture becomes more like a glaze than a stiff icing. There is no wrong way to eat a cinnamon roll, do not get me wrong. But when the frosting drips down into the crevices between rolls, that is the best part. I will not accept debate on this.
So the order is: pull the metal pan out of the oven, wait five minutes, then slather the frosting on aggressively. That is the exact moment in the photo. The rolls are still steaming, the frosting is sliding downward, and the whole kitchen smells like brown butter and sugar. You get that glossy swirl marks on top instead of blobs.
If You Only Have a Glass Dish, Do This One Simple Fix
Ok so you live in a rental with limited baking gear, I get it. You can still salvage the situation with an adjustment. Reduce the oven temperature by 25 degrees. This slows down the browning process on the bottom of the pan. Then add about five to ten minutes to your bake time to make sure the centers set. The bottom will still get darker than a metal pan, but it might be edible.
Another trick is to line the glass dish with parchment paper. That adds a thin air barrier and stops the dough from sitting directly on the hot glass. It is not a perfect solution, but it helps. Also, take the pan out and put it on a wire rack immediately. Do not leave it in the hot pan, the residual heat will keep cooking the bottoms while the roll cools.
But look, these are workarounds, not fixes. The real fix is using a metal pan. Your homemade cinnamon rolls deserve the right equipment, and that equipment is a plain, boring, reliable metal sheet. Go spend the few dollars and save yourself the heartbreak.
Baking is already a gamble with yeast and rising times. Give yourself a fighting chance by controlling the one variable that is easy to control. The pan material is a boring detail, until it is the difference between a tray of golden spirals and a tray of burnt discs.
So next time you make a batch, grab the metal pan, bake them until they are just golden, and pour that cream cheese frosting on while the steam is still rising. That is the whole secret. Save this tip for your next block off and give your rolls the bottom they deserve.
Leave a Comment