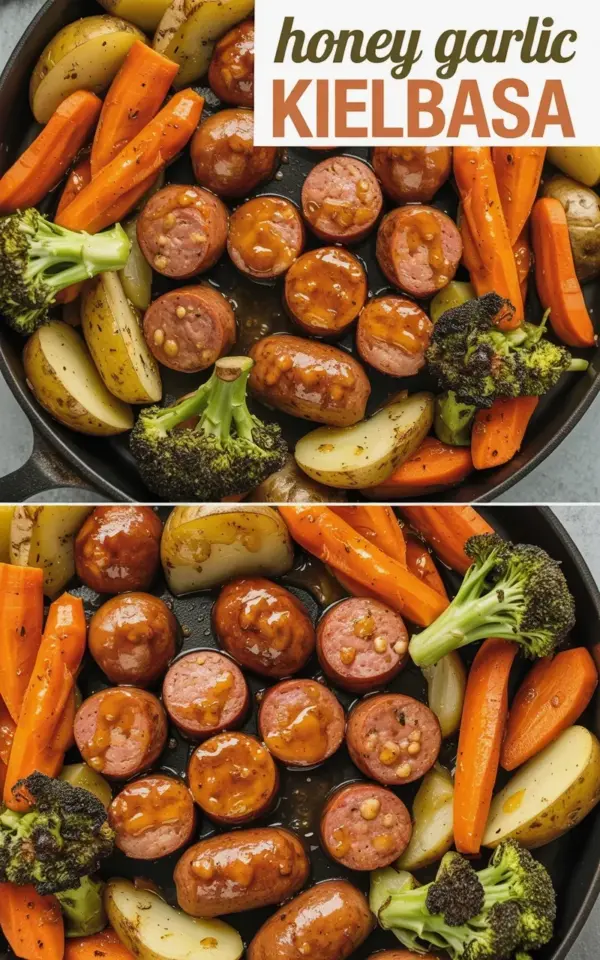
The cast iron pan is already smoking, the kielbasa slices are hitting the hot surface, and you’re eyeing that bottle of honey garlic sauce on the counter. But wait, how many sausages did you just toss in there? Did you dump the entire package into the skillet at once, or did you give each piece some breathing room? That decision, right there, is the difference between a sticky, soggy mess and the glossy, caramelized dinner you see in the photo with the charred carrots and golden potatoes.
Making honey garlic kielbasa in a cast iron skillet is a fantastic weeknight move, but it has one major trap that turns a great meal into a letdown. Let’s talk about exactly why that happens and how to get that perfect, shiny glaze every single time.
Why Crowding the Pan Ruins the Honey Garlic Kielbasa
Here’s the thing about cast iron: it is a heat magnet, but it cannot work miracles. When you pile too much food into the skillet, the temperature plummets instantly. All that cold meat and those raw vegetables start releasing moisture to compensate for the sudden drop in heat.
Instead of searing, you are now boiling your dinner. The honey garlic kielbasa simmers in a puddle of water and fat, which means the surface never gets that golden crust. The glaze turns into a thin, watery soup instead of a thick, clinging coating. It is a real bummer, especially when you are trying to get those bright orange carrots and dark green broccoli florets to look as good as they do in the recipe photos.
The Right Way to Layer Your Cast Iron Skillet
Alright, so you have to resist the urge to dump everything in at once. The order of operations matters just as much as the space you give the food. If you are making a full one-pan dinner with sausage, carrots, potatoes, and broccoli, you need a game plan. Root vegetables like potatoes and carrots take way longer to cook than broccoli, so they need a head start.
Start by getting your cast iron skillet ripping hot over medium-high heat. Add a splash of oil with a high smoke point, like avocado or canola. Lay the kielbasa slices in a single layer first. Let them sit there, untouched, for a solid 2 to 3 minutes. You want that browning on the cut sides. It is like toasting bread, you cannot rush it.
Once the kielbasa has a nice sear, push it to the sides of the pan. Now you can add the potatoes and carrots. Again, make sure they have contact with the hot pan surface. If they are stacked on top of each other, they will just trap steam. Let them cook for a few minutes before you even think about moving them.
Getting Those Golden, Caramelized Potatoes
The halved potatoes in that image are not just boiled and tossed in sauce, they are caramelized. To get that golden edge, you have to treat them like the star of the show, not just an afterthought. Cut them into even, uniform halves or quarters so they cook at the same rate. Toss them with a little oil, salt, and pepper in a bowl before they hit the pan.
Now, the patience part. Put the potatoes cut-side down in the hot pan. Resist the urge to stir. Let them sit for 4 to 5 minutes, maybe a little longer. You are looking for a deep, brown crust to form on the flat cut side. Once you see that, you know you are on the right track. Moving them too early just means they will stick or break apart.
Timing the Broccoli and the Honey Garlic Glaze
Broccoli is the wildcard in this dish. It has a tendency to go from bright green to mush if you cook it too long. Add the broccoli to the pan near the end of the cooking process, once the potatoes are mostly fork-tender. You actually want the broccoli to catch a bit of that browning, too, a little char on the floret edges adds amazing flavor.
Here is a trick that often gets overlooked: do not add the honey garlic sauce too early in the cooking process. Most sauces contain sugar, and sugar burns quickly over high heat. If you pour the glaze over everything too soon, you will get a scorched, bitter taste that ruins the whole pan.
Wait until the vegetables are almost done, then reduce the heat to low. Pour the honey garlic sauce over the kielbasa and veggies. Toss everything to coat, and let it bubble gently for a minute or two. The sauce will thicken as it reduces, transforming into that gloss you see on the sausages in the pan.
Why the Cast Iron Skillet Matters for Weeknight Dinners
You might wonder why you should bother using a heavy cast iron skillet when a nonstick pan is easier to clean. Look, cast iron gets hotter and holds that heat way better than anything else. This is exactly what you need for a recipe that relies on searing. When you put food in a cast iron skillet, it does not cool down as fast, which means that crust forms much more efficiently.
The nonstick coating on regular pans often breaks down at the high temperatures needed for browning. Cast iron just takes the heat and gives you that flavor and color you are chasing. Just make sure your skillet is well-seasoned first. A smooth, seasoned surface is naturally nonstick, so your caramelized potatoes and glazed kielbasa won’t leave a stubborn mess behind.
The other benefit is the one-pan cleanup. You have to love a dinner that uses one pan for the sausage, the carrots, the potatoes, and the broccoli. It keeps the whole operation simple, which is what a weeknight dinner should be.
Quick Fixes if the Glaze Goes Wrong
Ok so, sometimes things still go sideways. Here are the most common pan issues and how to fix them fast:
- Too much liquid pooling: Take the food out, crank the heat to high, and let the liquid boil off before adding it back.
- Glaze got sticky and clumpy: Add a splash of water or low-sodium chicken broth to loosen it up, stir well.
- Broccoli turned sad and gray: Pull it out early next time, or throw it in with just 3 minutes left on the clock.
- Sausages look pale: They never got a good sear, the pan was too crowded or not hot enough.
My Secret for an Even Better Sear
Honestly, I have made this honey garlic kielbasa recipe enough times to know that patience is the only real secret. My house rule? If I think the food has been sitting still for one minute, I force myself to count to thirty before I touch it. It sounds silly, but it works. Cooking in cast iron is about letting the Maillard reaction do its thing, and that just takes time.
If the honey garlic sauce starts to reduce and get too thick before the potatoes are fully cooked, just pop the whole skillet into a 400°F oven for a few minutes. The radiant heat surrounds everything and finishes the cooking without burning the sugar. It is a great backup plan.
One last thing, and this is my mildly obsessive tip: use room temperature kielbasa. If you slice the sausage right from the fridge, it shocks the pan and lowers the temperature. Give it ten minutes on the counter while you get the carrots and potatoes prepped to make sure those sausages start sizzling immediately. You will taste the difference.
Honey garlic kielbasa in cast iron is one of those reliable meals that looks impressive and tastes even better. Just remember to give your food some space. Save this guide for your next easy weeknight dinner and grab your favorite skillet. Have you tried this method yet? Let me know how your glaze turns out in the comments below.
Leave a Comment